The Assembly Tools
- Viktor Kuzev
- Feb 6, 2023
- 4 min read
Almost two years ago I posted about a tool for dimensioning Curtain Wall assemblies.
This was the first tool I made for Line Systems and it was a challenge - it needed to cover different scenarios that were not always well-defined.
Last year, they reached out to me again. They had a new BIM manager and new workflows in place and the dimensioning tool needed an update to accommodate that.
Eventually, we created more than an update - we made a whole workflow combining the efficiency of automation (using code with pyRevit) and the efficiency of their new ways of working.
As you can see in the video - there are three buttons, corresponding to three steps of the automation - Creating the Assemblies, Placing Tags and Placing Dimensions.
Now I have to mention these three could be combined in one - it could be one button that once the selection of the curtain walls is done not only creates the assemblies and their views, but also places tags and Dimensions.
It is actually very tempting to create tools in this way - One Button Does It All. Sounds flashy and impressive.
However, after discussions with the client, it was decided to divide them into 3 and this is allowing for more flexibility in how they are used.
So as it is shown in the video - the first tool facilitates the creation of the assembly, its views and sheets.
My impression is that most people have used Revit for years without ever using the assemblies so I had to show the manual way of using the assemblies in the first part of the video.
One question you might have is that if it is so cumbersome to create the assemblies, to rotate their origin, then to create the views, to duplicate and move the sections (because there is no other way to create two parallel sections in an assembly) why would you go through that?
The answer is that even without the automation tools the assemblies have some key advantages:
They show only what is in the assembly and nothing else. If you were to replicate the same without assemblies you would need to either hide everything else so it isn’t visible in the views or make a group and place a different instance of the group somewhere isolated in the project file, possibly on a separate design option and create the views there. Hiding everything else permanently isn’t as straightforward as you might think even if you are a worksets and filters master.
They keep things organised. - You get a separate place in your project browser for the assemblies.
When you try to create a new assembly out of the same elements that are already in an assembly Revit just switches them to the assembly. This is to ensure that there are no two assemblies representing the same object.
So what about the tool?
Creating The Assemblies.

As you can see in the video we can assign a starting prefix and a number for naming and we have two modes of running: single and multiple.
They both work by simply picking the curtain walls and all the elements on the walls are added to the assembly.
The "single" is good for making one assembly per curtain wall, so we can select many different walls and the tool is going to make an assembly out of each one of them like so. The "multiple" mode is good for making one assembly out of multiple curtain walls.
The tool works by selecting a curtain wall but it adds all the dependent elements of that wall and its nested walls.
The selected ones are highlighted in green and if I want to deselect a wall I can simply click on it again.
Elements of already existing assemblies are highlighted in red and their curtain wall can’t be selected - there is a selection filter that filters them out of the available elements.
Then the tool creates the views, assigns pre-selected templates to them and places them on a newly created sheet if this is specified in the settings of course.

In the settings we can select what view we want to create, we can pick their locations on a sheet and we can even specify their coordinates on that sheet - these locations are going to be used if we have selected the “Create Sheet” option.
We can also select the view templates for each view as well as a titleblock for the sheet.
There is an option to select section markers for the door and panel sections.
In the bottom we can type the name of the Shared Parameter (or project parameter) that is used for the identification of elements of the same assembly - the tool assigns that automatically as well for the corresponding curtain walls, mullions and panels.
Placing the tags.
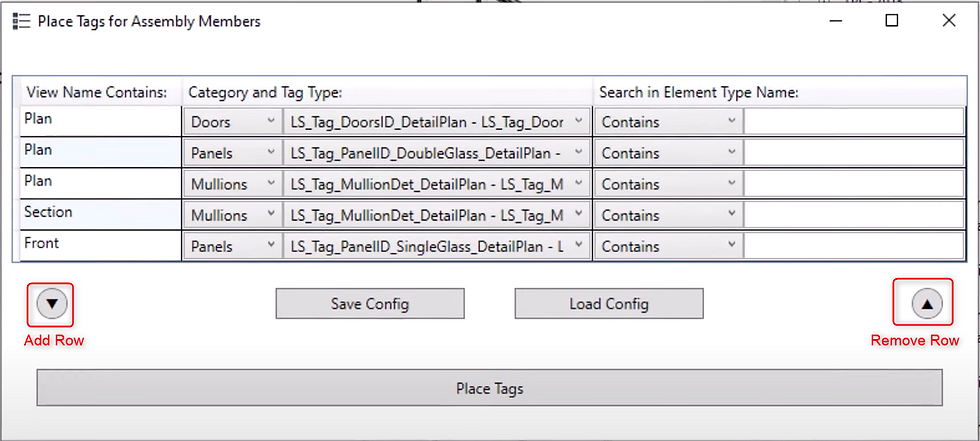

To place the correct tags the tagging tool works by a filtering system.
A tag type is assigned based on the category of the element, the name of the view and whether the Type name contains a certain string (or strings)
New rows can be added and once we have a configuration we want to use multiple times we can save it and load it. Thus different configurations for different types of projects are easily saved and re-used.
Placing the dimensions
The dimensions are still the biggest challenge.
However, the new updated version has more controls and is achieving far better results.
We have controls of the different dimension lines positions (with offsets) and the different dimension types.
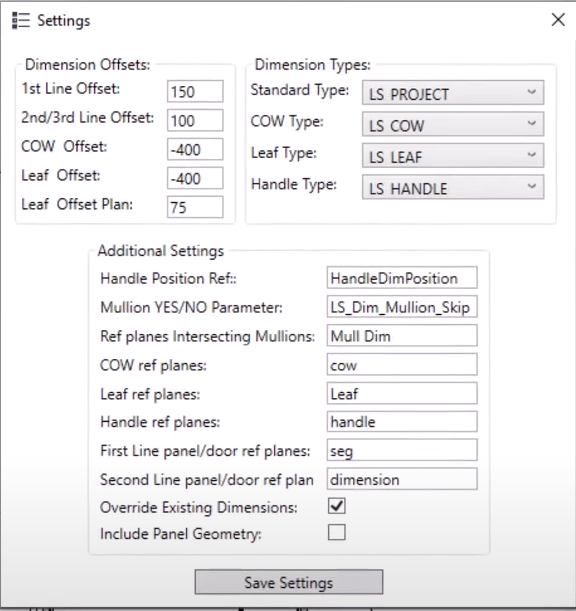
Additionally, we have a few fields to enter special reference plane names to use in some specific cases. These reference planes are inside the panel and door families and mark where certain dimensions should point to.
There is also a Mullion Type parameter specified. So some mullion types could be skipped (dimensions are not going to be made for them) if they have a checked YES/NO parameter.
There is an option to determine whether you want to override the existing dimensions in a view or keep them assuming there have been manual changes made.
And that is the tool.
We achieved this great tool that saves a ton of time by working and planning together.
It was a pleasure to create this tool for Line Systems and the communication with their BIM manager was easy and fun. After all, I’m a BIM manager too.
I have built a lot of other tools too and I’m planning to post about them too.
Stay tuned
Viktor
Comentarios